Brocade Cape Dress
This post may contain affiliate links – this means I may receive a commission if you decide to make a purchase through links on this post, at no additional cost to you. Affiliate links will be marked with an asterisk (*).
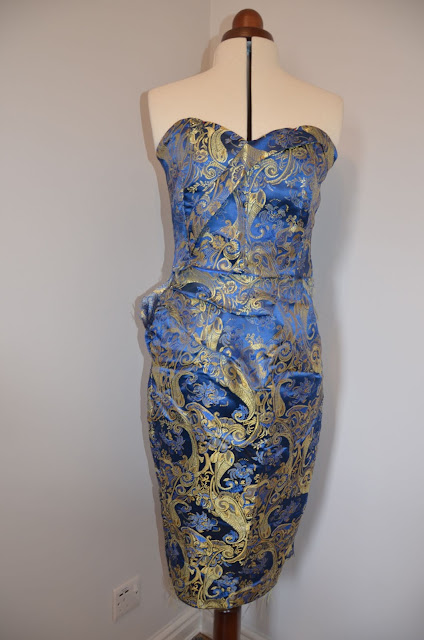
As I mentioned back in May, I've been trying to avoid buying unnecessary fabric recently, and instead have been focusing on either finishing off old, abandoned projects, upcycling old clothes, or using up stash fabric. This project fits into the first category, as a dress I originally started about two years ago and then gave up on.
(before)
The issue with this dress was, I wasn't very used to making structured bodices at this point, and I massively messed up the fit. I don't know if you can tell from the "before" photo, but the bodice is unflattering at the waist and unshapely at the bust, and the skirt tucks are in the wrong place, creating unseemly bulk at the crotch area. This was (and still is) my absolute favourite fabric I have ever owned, and I was completely devastated at the thought of having wasted it. I'd also bought it as a destash off ebay back in 2009-ish, so there was absolutely no hope of buying more of the same. So, in the hopes that future Olivia would be able to fix it for me, I relegated it to the UFO (unfinished object) box under my bed and let that be that.
(before)
Now onto the (re)construction! With all the bodice pieces cut out of my main fabric, I then cut them out of a canvas interlining layer. I do this with pretty much all my boned bodices these days, it just helps give a bit more structure and firmness to the whole thing. I then hand basted each outer piece to its corresponding interlining piece - you could do this on a machine using a long thread length, but I find anything silky will slip about too much under a machine, and it's much safer to just do it by hand, even if it does take 10 times longer.
With the outer bodice prepped, it was time to start sewing everything together. At this stage, I didn't want to sew the centre front seam, as this was where the band pieces needed to go, so I sewed the bodice front to bodice front side, to bodice back side, to bodice back, clipping the curves before sewing to get a nice, smooth curve. I then realised that the band pieces would need to slot in at the side seams, so unpicked the top couple of inches to allow for that.
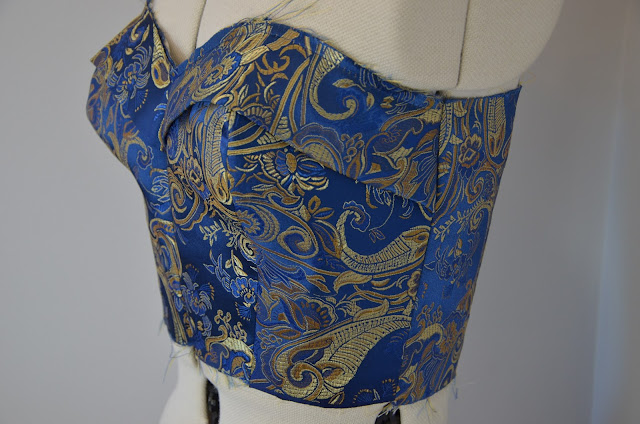
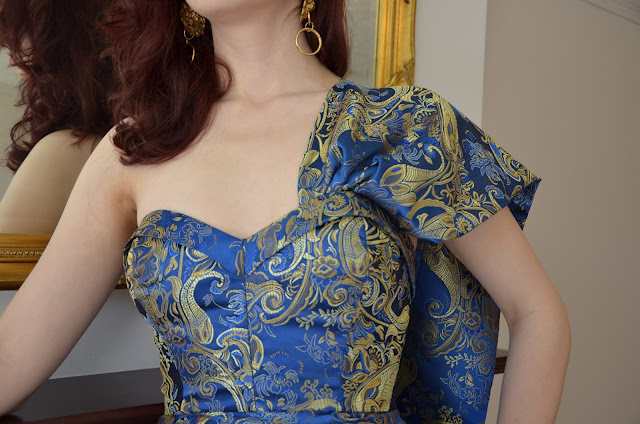
For the band, I used the pattern piece from the Simplicity 1426* vintage bra top, but altered it to fit this bodice - though you could get away with a rectangle that slants slightly from wider to thinner (I'm sure this has a technical name) if you wanted to try this at home. I cut two of these, one for each side of the front, which were folded wrong sides together and basted to the top of the bodice before machine sewing down. Everything rests on the two bands meeting on the centre front seam, so a lot of time was spent making sure everything matched up beforehand. If you're sewing something like this, where the positioning is crucial, I recommend sewing the first inch or so of that particular section first, ignoring the rest of the seam for now. Do this on both pieces and check they do match up, and only when they do, should you continue sewing the rest of that section. This ensures that nothing slips out of place before you get to the all-important bit, and makes it easier to unpick if you do need to go again.
With the band sewn on, I then sewed up the centre front seam and the rest of the side seams that I'd left open, and that was the bodice outer done for now. With the lining, I again cut this out from a mix of old bodice scraps and a fabric remnant, then sewed up all the seams excluding the centre back seam, clipping curves as required. All the seams were pressed open, and then I sewed bias binding over these seams to act as boning channels. I also added in an extra channel on the side front panels, to give the bust a bit of extra support.
Then I sewed the lining to the outer fabric, then understitched the lining to prevent it from popping out. Now it was time to get boning! I pretty much always use spiral steel boning, as I love the sturdiness it gives to a garment, so I cut my boning to length and then capped all the pieces. These all slid into their correct channels, which completed the bodice for now.
Onto the skirt. There's less to say about this - basically all I did was pin my old skirt front onto my dress form, and play about with it until I liked how it looked. I changed the two massive tucks to three smaller ones, and eased out the excess fabric there was around the hips. Luckily, the skirt back pieces were fine, so they didn't need any work at all. I sewed this all up, then did the same with the lining, then slotted the lining into the outer skirt, so I could hem it and sort out the back slit all as one. With that done, I machine sewed the skirt outer to both bodice pieces, then sewed in a lapped zip. Then I hand stitched the bodice lining down, covering the inside of the zipper tape, then did the same with the skirt lining down, to cover the waist seam stitching line.
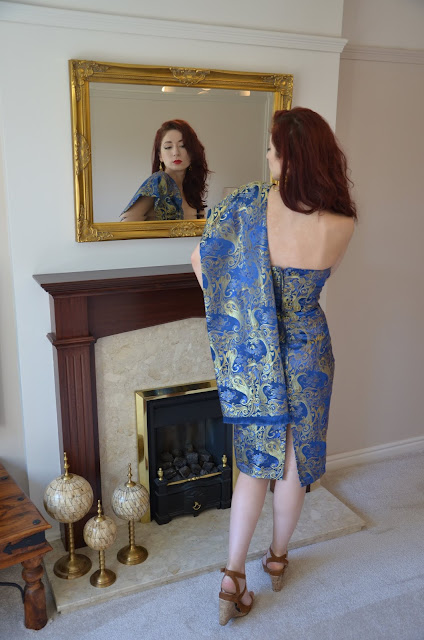
We're almost there! Now all that remains is the cape/sash. After everything was cut out, I was left with a rectangle measuring roughly 1m x 50cm. I sewed the two long edges right sides together, gave this seam a good press, and then turned it out, adjusted the fabric so this seam lay in the centre, and pressed it into shape. Then I flipped it inside out again to sew down one of the short sides. The other side was all pretty and frayed so I just left this as-is, with no sewing. On the side I was going to sew, I added in a couple of pleats to give the thing some shape, then sewed this down and flipped it out, and hey-presto, I had a cape-type thing! I then sewed on two buttons, equidistant from the sash centre, and sewed two matching buttonholes on my bodice, equidistant from the princess seam - these were hidden out of sight by the band at the top of the bodice. I couldn't decide which side to put the sash, so I ended up doing this on both sides of the bodice, giving me four buttonholes total.
I couldn't be happier with how this ended up. After being plagued by fears of having ruined this fabric for so long, I feel like I've finally done it justice, which if nothing else, is a massive weight off my mind. Ruining beautiful/irreplaceable fabric is probably my no.1 fear in sewing, so I'm mighty pleased that I managed to rectify my initial mistakes and turn this into something wearable. This has also ended up being my best-fitting structured bodice so far - it's incredibly figure hugging and does suck me in a tiny bit, but it's not so tight that the boning digs into me, which is honestly all I've ever wanted from one of these dresses.


Comments
Post a Comment