Honeycomb Smocked Shirt Dress
This post may contain affiliate links – this means I may receive a commission if you decide to make a purchase through links on this post, at no additional cost to you. Affiliate links will be marked with an asterisk (*).
(Sorry I've taken so long to post anything - I've been having issues with linking to my blog and didn't want to post if it wasn't going to be seen. But I *think* that's sorted now, so I can return to my regular schedule!)
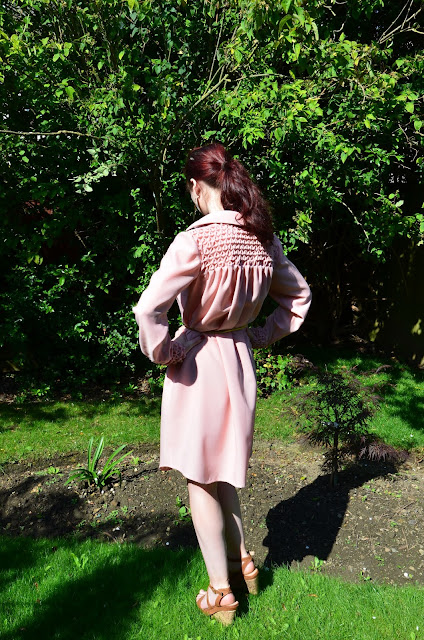
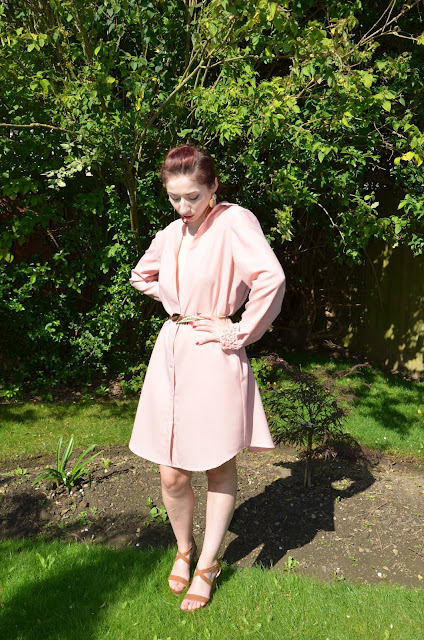
I went for Butterick B5526 for this, a pattern I bought a few months ago with the aim of making myself loads of new shirt dresses for the summer, an aim that still, in late August, hasn't even been remotely achieved. But enough of that. I went for option C, the tunic style, and lengthened it an extra 10 inches or so to make it dress length. I used some pink twill crepe* - light enough to make this a flowy summer shirt, but just sturdy enough to take the bulk of the smocking without collapsing - and I used 11mm fisheye buttons* in the colour pale pink for closures.
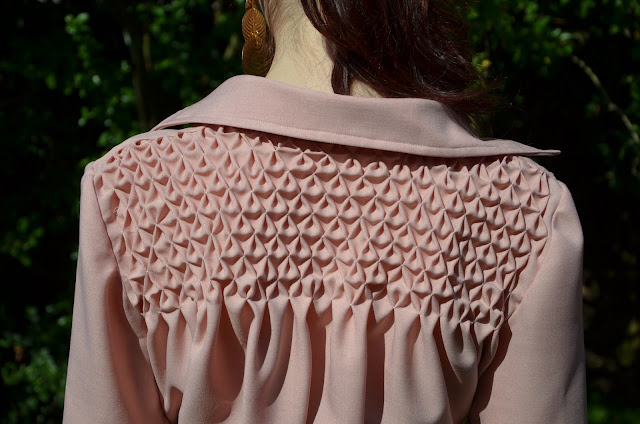
To allow room for the smocking, I doubled the cuff pattern lengthwise, and for the back pattern piece, I measured the back neck measurement for my size, then doubled it, then did the same for the back shoulder measurement. As the back was all cut as one piece (on the fold, no separate yoke piece) this meant that the whole of the back would be bigger, even the parts not being manipulated, but in this case, that's what I wanted, as it means you get a kind of gathered effect down the rest of the back.
This gives you the added benefit of having a lot of room to grow (say, if you take it on holiday someday, where you intend to eat a lot at the breakfast buffet) while looking chic at the same time. This method isn't the most precise way to alter patterns, but it works just fine while I'm still trying to get to grips with the whole smocking thing, and it's just so much faster.
This gives you the added benefit of having a lot of room to grow (say, if you take it on holiday someday, where you intend to eat a lot at the breakfast buffet) while looking chic at the same time. This method isn't the most precise way to alter patterns, but it works just fine while I'm still trying to get to grips with the whole smocking thing, and it's just so much faster.
Then came the hand sewing process - the back probably took me 2-3 hours, with an extra hour for the cuffs. I do really enjoy hand sewing though - I find it much more relaxing than regular sewing, so any excuse to sneak some into a project and I'm there. Once that was done, I interlined the cuffs with the same fashion fabric, but this time the pieces were cut to the original size. This was instead of the interfacing the pattern calls for - I didn't want to stiffen the fabric before smocking, as this would have created a more rigid effect that wouldn't have matched the back, and I sure as hell wasn't ironing on some interfacing afterwards, so interlining was the best choice.
This was also a good time to check whether my doubling method worked - if the smocked piece and the unadulterated piece matched up, then I'd done it right. Luckily, they did match up. Some might say I really should have checked this before cutting out a huge piece of fabric for the back, with no fabric to spare, and spending hours working on it, but hey, clearly I like living on the edge.
This was also a good time to check whether my doubling method worked - if the smocked piece and the unadulterated piece matched up, then I'd done it right. Luckily, they did match up. Some might say I really should have checked this before cutting out a huge piece of fabric for the back, with no fabric to spare, and spending hours working on it, but hey, clearly I like living on the edge.
After that, I pretty much just followed what the instructions said. I don't have enough experience in shirt making to be able to go off and do my own thing - maybe I would have if I'd made all those summer shirt dresses I'd planned to, but there you go. The only other alteration I made, if it can so be called, is I only added buttons from the waist down. It was looking so sleek before I started adding the buttons and buttonholes that I really regretted not making a covered button band. I'm not a massive fan of exposed shirt buttons, but truth be told, I forgot about sewing the extra band until it was too late.


I love the color of this shirt dress! I may have commented this before, but your smocking is so much better than what you get from the store. You continue to be such an inspiration to me, and you are easily one of my favorite bloggers and content creators.
ReplyDeletexoxo Amanda | theaestheticedge.com
Thank you so much! That really means so much to me! :D
DeleteKindly provide the pattern for this smocking, dear Mam.
ReplyDelete