Wissew Camelia Dress
This post may contain affiliate links – this means I may receive a commission if you decide to make a purchase through links on this post, at no additional cost to you. Affiliate links will be marked with an asterisk (*).
In my ongoing quest to work through my fabric stash, works in progress, and random clothes for upcycling, I came across this green maxi dress that I bought probably over a decade ago, which I wore once, and realised I didn't like. I'm not really a maxi dress person, and I found the shape of this really unflattering on me, so I thought this would make a great upcycling project.
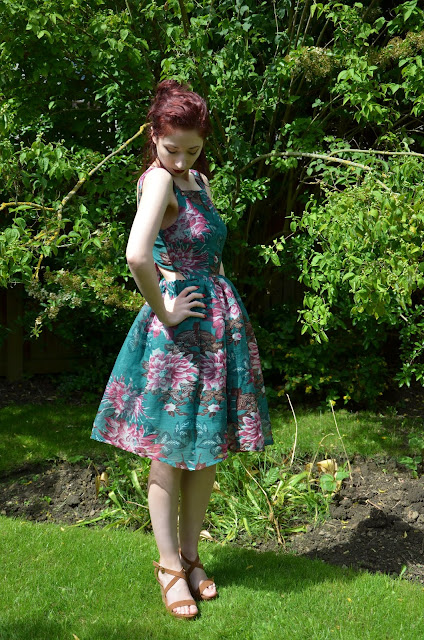
I'm not 100% sure what the fabric is, but I would guess it was a crinkle georgette. With its pink floral design, it was screaming out for a summer dress transformation, something light and floaty and less structured than the dresses I usually make. I wasn't particularly inspired by any of the patterns I currently owned, nor was I feeling like drafting something myself, so after cutting the dress up, I just sort of left it for a week or two. Then I came across the Camelia dress, a summer frock with a tie back and gathered skirt, and I knew my search was over. Full disclosure - this pattern was provided to me by Wissew in exchange for review, which means that technically, this dress ended up being completely free. Woohoo!
This was a print at home pattern, so the first step was to get everything printed out and stuck together. The skirt is made up of two rectangles, and I really appreciated the fact that the pattern gave the measurements of these, meaning you have the option of either printing these out with all the other pattern pieces, or simply drawing them straight onto your fabric, saving a lot of time and a lot of paper (this was the option I went for).
The pattern pieces do come with seams allowed, but they are only 0.5cm, which for me is far too fiddly to work with. I increased mine to 2cm, which meant that I'd have just enough allowance for a narrow French hem, which is my preferred way to finish seams if they're not covered by a lining. Just make sure to draw on your added seam allowance before you start cutting out your printed pattern, or else you're going to end up making things very complicated for yourself (I may have forgotten to do this with the first piece and it was very annoying having to sellotape paper scraps back on).
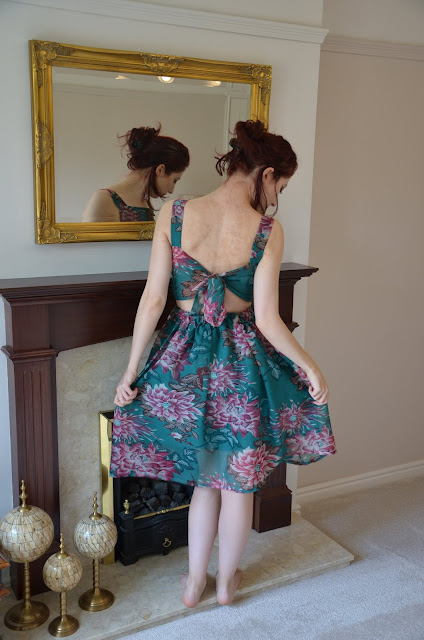
The pattern itself is for an unlined dress, but since I was working with semi-sheer fabric, I added in a skirt lining, using the lining from the original dress, and backed the front bodice section and the straps with this same material. The tie back piece is self-lined, i.e. both the outer and lining are cut from the fashion fabric, and the layers are sewn together and then bagged out, so I didn't back this with the lining fabric.
The instructions were a little vague at points, so though it's a relatively simple dress, I'd recommend it more for intermediate sewers than beginners, as I'd say you need to be reasonably familiar with the basic steps of making a dress in order to make complete sense of the instructions. But once you know what you're doing, it's a pretty quick make - I think this took me about five hours (though I really have no idea whether I'm fast or slow).
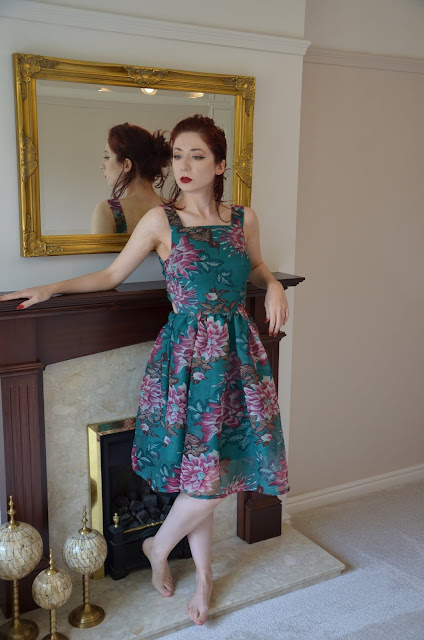
There were a couple of alterations I made. Firstly, I changed the front neckline from a v-neck to a square neck - I don't know why, but I'm not a massive fan of v-necks that aren't plunging (that probably says a lot about me...). This was a very simple hack, I just took the front bodice piece and continued the centre front line up to about the height of the shoulder, then continued the shoulder line across to meet this. I then made sure to mark where the original neck edge was, as this is where the strap needs to go, and hey presto, you have a square neckline!
Secondly, I know I said I wanted something unstructured and floaty, but I found the front piece was a little too loose under the bust, so I added in extra darts - the pattern already has bust darts heading from the armhole, but I felt that adding in bust darts from the waist helped give it a closer, more figure-hugging fit. This absolutely isn't necessary, as I don't believe the pattern is meant to be figure-hugging, but if you're like me and you want everything sitting flat, extra bust darts definitely helped achieve this!
I also lengthened the skirt a little, as I've become quite partial to ones that sit at knee length, but again this was just a personal preference thing. One hack I normally do, but didn't have enough fabric to do here, was pockets. If you can, always add pockets. But other than all those tweaks and hacks, I swear I did keep to the pattern/instructions!
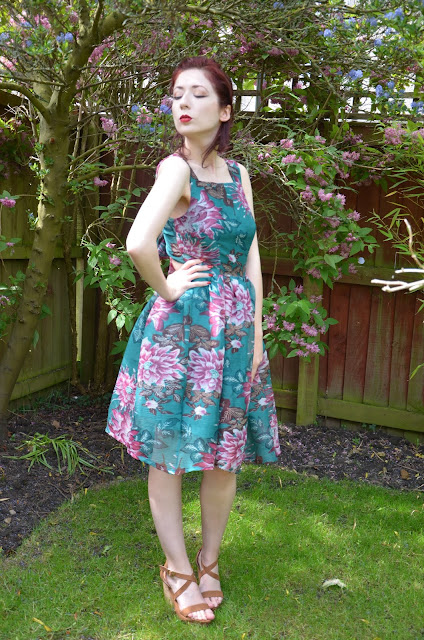
Overall, I really love this dress, and it would be great for summertime frolics if I was a) leaving the house and b) the sun was actually shining (curse you, English summer!). It's wonderfully airy and comfortable to wear, and I really do adore the tie back detail. I love any excuse to make things tie up into a bow (I have far too many pussy bow blouses to count) and I love that it creates a cut-out effect between the tie back area and the top of the skirt.
I don't normally do much upcycling, and at least recently, I think everything I have upcycled was made from something else I've made, where I felt the sewing of the original item was suspect enough to warrant it being made into something else. This, however, was a ready-to-wear dress in like-new condition, and I have to admit I was a little apprehensive about setting my scissors on a perfectly good dress that could have just been given to charity for someone else to enjoy. If this project hadn't worked out, I'd have felt incredibly guilty for wasting the dress. But luckily, it did work out, so there's no need for any self depreciating from me today! I'm so glad I gave this a go, and that this dress that's gone unused and unloved for so long finally has a purpose in my wardrobe thanks to this transformation.
The pattern pieces do come with seams allowed, but they are only 0.5cm, which for me is far too fiddly to work with. I increased mine to 2cm, which meant that I'd have just enough allowance for a narrow French hem, which is my preferred way to finish seams if they're not covered by a lining. Just make sure to draw on your added seam allowance before you start cutting out your printed pattern, or else you're going to end up making things very complicated for yourself (I may have forgotten to do this with the first piece and it was very annoying having to sellotape paper scraps back on).
The pattern itself is for an unlined dress, but since I was working with semi-sheer fabric, I added in a skirt lining, using the lining from the original dress, and backed the front bodice section and the straps with this same material. The tie back piece is self-lined, i.e. both the outer and lining are cut from the fashion fabric, and the layers are sewn together and then bagged out, so I didn't back this with the lining fabric.
The instructions were a little vague at points, so though it's a relatively simple dress, I'd recommend it more for intermediate sewers than beginners, as I'd say you need to be reasonably familiar with the basic steps of making a dress in order to make complete sense of the instructions. But once you know what you're doing, it's a pretty quick make - I think this took me about five hours (though I really have no idea whether I'm fast or slow).
There were a couple of alterations I made. Firstly, I changed the front neckline from a v-neck to a square neck - I don't know why, but I'm not a massive fan of v-necks that aren't plunging (that probably says a lot about me...). This was a very simple hack, I just took the front bodice piece and continued the centre front line up to about the height of the shoulder, then continued the shoulder line across to meet this. I then made sure to mark where the original neck edge was, as this is where the strap needs to go, and hey presto, you have a square neckline!
Secondly, I know I said I wanted something unstructured and floaty, but I found the front piece was a little too loose under the bust, so I added in extra darts - the pattern already has bust darts heading from the armhole, but I felt that adding in bust darts from the waist helped give it a closer, more figure-hugging fit. This absolutely isn't necessary, as I don't believe the pattern is meant to be figure-hugging, but if you're like me and you want everything sitting flat, extra bust darts definitely helped achieve this!
Overall, I really love this dress, and it would be great for summertime frolics if I was a) leaving the house and b) the sun was actually shining (curse you, English summer!). It's wonderfully airy and comfortable to wear, and I really do adore the tie back detail. I love any excuse to make things tie up into a bow (I have far too many pussy bow blouses to count) and I love that it creates a cut-out effect between the tie back area and the top of the skirt.


I love the colors, and this dress is very flattering on your frame! I appreciate how the skirt part has some volume to it but it's not overdone. What a perfect spring/summer dress.
ReplyDeletexoxo Amanda | theaestheticedge.com